【Unity】Vector3を使った移動方法や長さを低負荷に取得する方法
はじめに
この記事ではUnityのVector3の使い方を紹介します。
Vector3とは
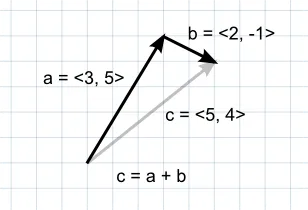
Vector3とは日本語でベクトルのことで、「大きさ」と「方向」の成分を持っています。
詳しくは高校の数学の範囲になるのですが、Unityでは「位置」と「方向」を指定したいときに使うと考えればいいと思います。
ちなみに、Unityの単位では、1辺や1マスの長さが1mなので、移動距離やスケールには注意してください。
ベクトルの例
Vector3の準備
今回は「Test」スクリプトを作成し、赤色のSphereへアタッチします。また、原点(x, y, z) = (0, 0, 0)の目印に青色のCubeを設置しました。
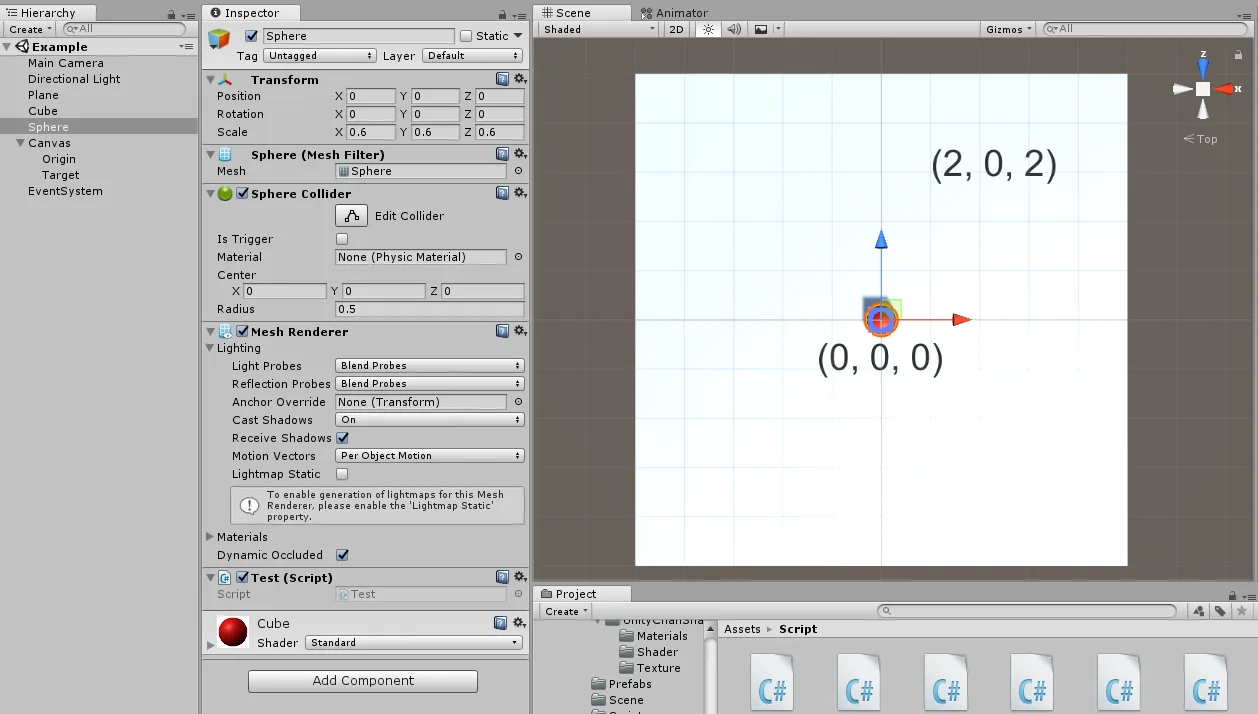
Vector3で座標を指定してオブジェクトを設置する
using System.Collections;
using System.Collections.Generic;
using UnityEngine;

public class Test : MonoBehaviour
{

    // Use this for initialization
    void Start()
    {
        //Vector3(x, y, z)
        Vector3 a = new Vector3(2f, 0f, 2f);
        transform.position = a;
    }

    // Update is called once per frame
    void Update()
    {

    }
}
Vector3 を使用するときは、「Vector3 a = new Vector3(x, y, z);」のように宣言します。
newを見てもわかるように、これはVector3 型のクラスをインスタンス化しています。
インスタンス化については難しく考える必要はありません。今は単純に、「使用可能にするための呪文」くらいに考えて構いません。
クラスの使い方について知りたい方はこちらの記事も参照してください。
オブジェクトの位置を変更するには、「transform.position = a;」のように記入してください。これで、a = (2, 2, 2)方向の成分を持ったベクトルを代入したことになります。
今回はaを位置として扱っていますが、aの方向に力を加えたりもできます。
ちなみに、丁寧に書く場合は「this.gameObject.transform.position = a;」となります。オブジェクトに直接アタッチする場合は自動的に「このオブジェクト」であるSphereが指定されるので、省略することができます。
Vector3 の足し算
using System.Collections;
using System.Collections.Generic;
using UnityEngine;

public class Test : MonoBehaviour
{

    // Use this for initialization
    void Start()
    {
        //Vector3(x, y, z)
        Vector3 a = new Vector3(2f, 0f, 2f);
        a.x += 1f;
        a.z += 1f;

        this.gameObject.transform.position = a;
    }

    // Update is called once per frame
    void Update()
    {

    }
}
Vector3の各成分に加算したいときは、「a.x += 1f;」「a.y += 1f;」「a.z += 1f;」のように記述します。
Vector3同士の足し算がしたいときは、以下のように記述してください。同様の結果が得られます。
using System.Collections;
using System.Collections.Generic;
using UnityEngine;

public class Test : MonoBehaviour
{

    // Use this for initialization
    void Start()
    {
        //Vector3(x, y, z)
        Vector3 a = new Vector3(2f, 0f, 2f);
        Vector3 b = new Vector3(1f, 0f, 1f);

        transform.position = a + b;
    }

    // Update is called once per frame
    void Update()
    {

    }
}
上記のコードではVector3 のa と bを足し合わせることで座標を変更しました。これを図で表すとこのようになります。
Vector3 の引き算
using System.Collections;
using System.Collections.Generic;
using UnityEngine;

public class Test : MonoBehaviour
{

    // Use this for initialization
    void Start()
    {
        //現在地のVector3(1f, 0f, 1f);
        Vector3 a = transform.position;

        //目的地のVector3(3f, 0f, 3f);
        Vector3 b = new Vector3(3f, 0f, 3f);

        Vector3 direction = b - a;

        transform.position = direction;
    }

    // Update is called once per frame
    void Update()
    {

    }
}
実行結果
方向:(3.0, 0.0, 2.0)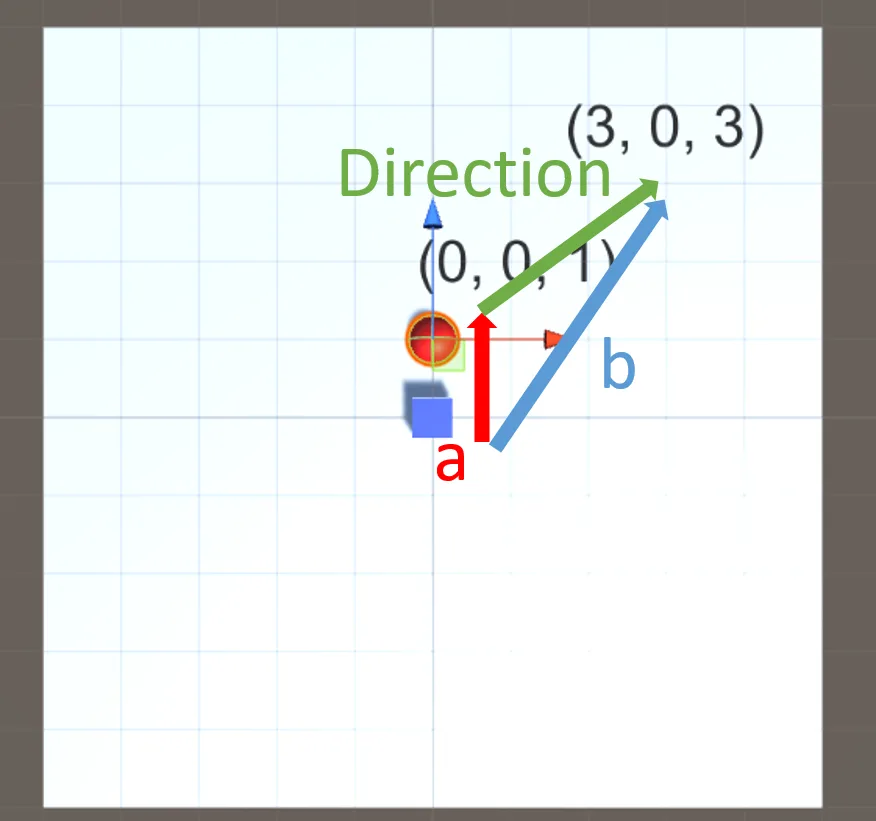
ベクトル同士の引き算では、「Vector3 direction = b - a;」のように、「ターゲット — 自分の位置」です。これで、「自分の位置からターゲットへの方向と大きさ」を示します。
「b = a + direction」なので、現在地からターゲットへ移動したい場合は、「transform.position = a + direction;」のように使用します。
using System.Collections;
using System.Collections.Generic;
using UnityEngine;

public class Test : MonoBehaviour
{

     // Use this for initialization
    void Start()
    {
        //現在地のVector3(1f, 0f, 1f);
        Vector3 a = transform.position;

        //目的地のVector3(3f, 0f, 3f);
        Vector3 b = new Vector3(3f, 0f, 3f);

        Vector3 direction = b - a;

        //b = a - direction
        transform.position = a + direction;
    }

    // Update is called once per frame
    void Update()
    {

    }
}
Vector3を使用した移動方法
・Transform.position += transform.Vector3 * Time.deltaTimeを利用した移動
using System.Collections;
using System.Collections.Generic;
using UnityEngine;

public class Test : MonoBehaviour
{

    // Use this for initialization
    void Start()
    {

    }

    // Update is called once per frame
    void Update()
    {
        if (Input.GetKey("up"))
        {
            transform.position += transform.forward * 1f * Time.deltaTime;
        }
        if (Input.GetKey("down"))
        {
            transform.position -= transform.forward * 1f * Time.deltaTime;
        }
        if (Input.GetKey("right"))
        {
            transform.position += transform.right * 1f * Time.deltaTime;
        }
        if (Input.GetKey("left"))
        {
            transform.position -= transform.right * 1f * Time.deltaTime;
        }
    }
}
Input.GetKey("up")で矢印キーの上を押したときに実行されます。
forwardはVector3 (0, 0, 1)と同じ意味です。なので、現在のSphereのpositionに、「transform.forward」でVector3 (0, 0, 1)を加算し続けることになります。
forward等の単位ベクトルを他にも知りたい場合は公式サイトでご確認下さい。
https://docs.unity3d.com/ja/current/ScriptReference/Vector3.html
・Vector3.MoveTowards (Vector3 current, Vector3 target, float maxDistanceDelta)
using System.Collections;
using System.Collections.Generic;
using UnityEngine;

public class Test : MonoBehaviour
{

    Vector3 targetPosition;

    float speed = 1.0f;

    // Use this for initialization
    void Start()
    {
        //Cubuのオブジェクトの位置を取得
        targetPosition = GameObject.Find("Cube").transform.position;
    }

    // Update is called once per frame
    void Update()
    {
        float step = speed * Time.deltaTime;
        transform.position = Vector3.MoveTowards(transform.position, targetPosition, step);
    }
}
指定した座標に向かって移動したいときに使います。
使い方は「Vector3.MoveTowards (基準となる開始座標, 到達したい座標, 移動距離)」です。
今回の場合、基準となる開始座標はSphereの現在の位置、到達点はCube、移動距離は speed * Time.deltaTime = 1 m/s です。
別の移動方法を知りたい場合はこちらもご覧ください
/posts/unity-beginner-translate/
Vector3の長さを低負荷で取得「magnitude」「sqrMagnitude」
using System.Collections;
using System.Collections.Generic;
using UnityEngine;

public class Test : MonoBehaviour
{

    // Use this for initialization
    void Start()
    {
        Vector3 a = new Vector3(1f, 0f, 1f);
        Debug.Log("magnitude:" + a.magnitude);
        Debug.Log("sqrMagnitude:" + a.sqrMagnitude);

    }

    // Update is called once per frame
    void Update()
    {

    }
}
実行結果
magnitude:1.414214
sqrMagnitude:2ベクトルの長さを取得するには「a.magnitude;」のように使用します。
長さの取得には三平方の定理を用いています(厳密には内積を使って「Mathf.Sqrt(Vector3.Dot(v, v))」で求めていますが、結果は同じで処理速度の問題です)。

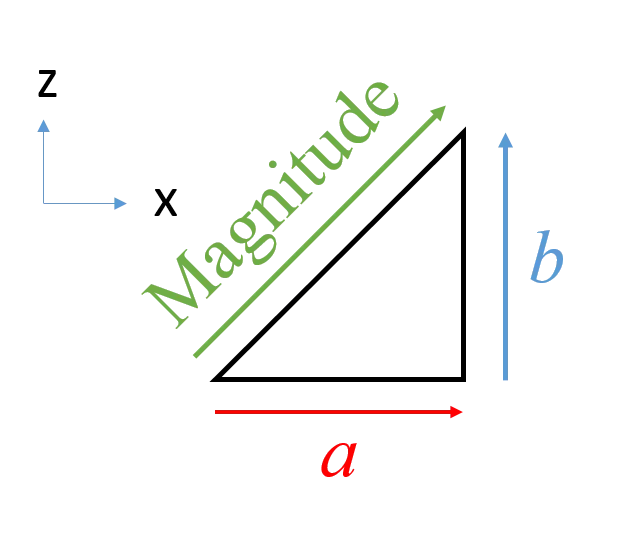
これで、上記の例の場合、「magnitude = √(1^2 + 1^2) = √2 = 1.414…」となります。
しかしながら、ルートの計算は小数点以下が多く、計算に大きな負荷がかかります。そこで、Unity は「a.sqrMagnitude」の利用を推奨しています。
これは、magnitudeを2乗したもので、

となります。
これであれば、ルートよりも軽い負荷で計算が可能になります。
例えば、Cubeから常に2mだけ離れたい場合は以下のようなコードになります。
using System.Collections;
using System.Collections.Generic;
using UnityEngine;

public class Test : MonoBehaviour
{
    float distance = 2f;
    float squareDistance;
    Vector3 targetPosition = new Vector3(0f, 0f, 0f);

    // Use this for initialization
    void Start()
    {
        //離れたい距離の2乗を取得
        squareDistance = Mathf.Pow(2f, 2);
    }

    // Update is called once per frame
    void Update()
    {
        //長さの2乗 > 離れたい距離の2乗
        if(transform.position.sqrMagnitude > squareDistance)
        {
            float step = 1 * Time.deltaTime;
            transform.position = Vector3.MoveTowards(transform.position, targetPosition, step);
        }
        //長さの2乗 <= 離れたい距離の2乗
        else if (transform.position.sqrMagnitude <= squareDistance)
        {
            transform.position = new Vector3(0, 0, distance);
        }
    }
}
離れたい距離「distance = 2f」を定義して、その2乗「squareDistance = Mathf.Pow(2f, 2);」を取得。
「if(transform.position.sqrMagnitude > squareDistance)」で「長さの2乗 > 離れたい距離の2乗」のとき、MoveTowardsでCubeの方へ移動。
離れたい距離の2乗よりも短い距離になったら、(0, 0, 2)へ移動。
これで、常に2m以上離れているように見えます。円の式などを利用してdistanceを調整すれば全方位に対応できます。
Vector3 の長さを正規化して1にする「Normalize()」「Normalized」
using System.Collections;
using System.Collections.Generic;
using UnityEngine;

public class Test : MonoBehaviour
{

    // Use this for initialization
    void Start()
    {
        Vector3 a = new Vector3(1f, 2f, 3f);

        Debug.Log("元のベクトル a:"+ a);
        Debug.Log("元のベクトルの長さ:" + a.magnitude);

        Debug.Log("Normalized(読み取り専用):" + a.normalized);

        a.Normalize();
        Debug.Log("Normalize:"+ a);
        Debug.Log("Normalize後の長さ:" + a.magnitude);
    }

    // Update is called once per frame
    void Update()
    {

    }
}
実行結果
元のベクトル a:(1.0, 2.0, 3.0)
元のベクトルの長さ:3.741657
Normalized(読み取り専用):(0.3, 0.5, 0.8)
Normalize:(0.3, 0.5, 0.8)
Normalize後の長さ:0.9999999正規化を行うと長さを1としたベクトルを作成できます。
使い方は、「a.normalized」や「a.Normalize();」のように利用します。これらの違いは「読み取り専用」か「実際に代入するか」です。
「a.normalized」は読み取り専用で、「a.x」や「a.y」のように要素を参照しているだけです。
これに対して「a.Normalize();」はメソッドであり、実際にaの長さを1にします。なので、Normalizeしたaに対して「a *= 5f;」のようにすれば、長さが5のベクトルが得られます。
参考サイト
Unity DOCUMENTATION
https://docs.unity3d.com/ja/current/Manual/UnderstandingVectorArithmetic.html
https://docs.unity3d.com/ja/current/ScriptReference/Vector3.html
https://docs.unity3d.com/ja/current/ScriptReference/Vector3-sqrMagnitude.html
げーむつくろ~
http://marupeke296.com/COL_Basic_No1_InnerAndOuterProduct.html