【Egret Engine】図形の描画方法「drawCircle」「drawRect」「lineTo」
はじめに
この記事では図形の描画方法を紹介しています。
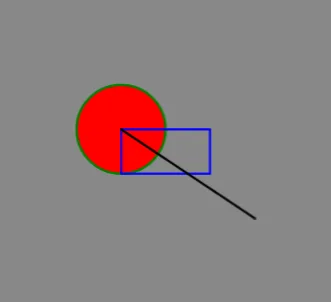
↓ 最終的にこうなります ↓
準備
1、新規Projectの作成
【Egret Wing】新規Projectの作成とエディタの使い方を参考にして、新規Projectを作成してください。
私は「TestProject」という名前で作成しました。
2、不要ファイルの削除
【Egret Engine】TypeScript の基礎を参考にして、asset等の不要ファイルやコードを削除してください。
GameStageの生成
Main.tsに以下のコードを記入してください。
class Main extends eui.UILayer {

    public constructor() {
        super();
        this.once(egret.Event.ADDED_TO_STAGE, this.addToStage, this);
    }

    private addToStage() {
        Game.init(this.stage);

        egret.startTick(this.tickLoop, this);
    }

    tickLoop(timeStamp:number):boolean{
        return false;
    }

}

class Game{

    static I : Game;
    static mainStage: egret.Stage;
    static height: number;
    static width: number;

    static init(stage:egret.Stage) {

        Game.I = this;
        Game.height = egret.MainContext.instance.stage.stageHeight;
        Game.width  = egret.MainContext.instance.stage.stageWidth;
        Game.mainStage = stage;

        /* メソッドなどを記入*/
        new GameStage();

    }


}

class GameStage extends egret.DisplayObjectContainer{

    static display : egret.DisplayObjectContainer = null;

    constructor(){
        super();
        this.initial();
    }

    initial(){
        GameStage.display = new egret.DisplayObjectContainer();
        Game.mainStage.addChild(GameStage.display);
    }


}

class GameObject extends egret.DisplayObjectContainer{

    object: egret.DisplayObjectContainer = null;
    static objects: GameObject[] = [];

    constructor(){
        super();
        this.initial();
    }

    initial(){
        this.object = new egret.DisplayObjectContainer();
        GameStage.display.addChild(this.object);
        GameObject.objects.push(this);
    }

}
Mainのstageに直接描画すると、ゲーム画面全体を動かしたいときに困ることがあるので、GameStageレイヤーに描画していきます。
テキストを表示する方法でも説明したように、GameStageとUIのレイヤーは分けておいた方がいいと思います。
図形を描画する際はGameObjectクラスを継承してください。自動的にGameStageレイヤーへ挿入されます。
図形をインスタンス化する場合はGameクラスのinit()内にnewしてください。
図形の描画
円の描画
class Main extends eui.UILayer {

    public constructor() {
        super();
        this.once(egret.Event.ADDED_TO_STAGE, this.addToStage, this);
    }

    private addToStage() {
        Game.init(this.stage);

        egret.startTick(this.tickLoop, this);
    }

    tickLoop(timeStamp:number):boolean{
        return false;
    }

}

class Game{

    static I : Game;
    static mainStage: egret.Stage;
    static height: number;
    static width: number;

    static init(stage:egret.Stage) {

        Game.I = this;
        Game.height = egret.MainContext.instance.stage.stageHeight;
        Game.width  = egret.MainContext.instance.stage.stageWidth;
        Game.mainStage = stage;

        /* メソッドなどを記入*/
        new GameStage();
        new Circle();

    }


}

class GameStage extends egret.DisplayObjectContainer{

    static display : egret.DisplayObjectContainer = null;

    constructor(){
        super();
        this.initial();
    }

    initial(){
        GameStage.display = new egret.DisplayObjectContainer();
        Game.mainStage.addChild(GameStage.display);
    }


}

class GameObject extends egret.DisplayObjectContainer{

    object: egret.DisplayObjectContainer = null;
    static objects: GameObject[] = [];

    constructor(){
        super();
        this.initial();
    }

    initial(){
        this.object = new egret.DisplayObjectContainer();
        GameStage.display.addChild(this.object);
        GameObject.objects.push(this);
    }

}

class Circle extends GameObject{

    constructor(){
        super();
        this.method();
    }

    method(){

        let shape:egret.Shape = new egret.Shape();

        //lineStyle(枠線の太さ, 色); beginFillよりも先に書く
        shape.graphics.lineStyle(5, 0x008000);

        //beginFill ~ endFill の間に書かれた図形を色で塗りつぶす。
        shape.graphics.beginFill(0xff0000);
        shape.graphics.drawCircle(200, 300, 100);//drawCircle(x, y, 半径)
        shape.graphics.endFill();

        this.object.addChild(shape);

    }


}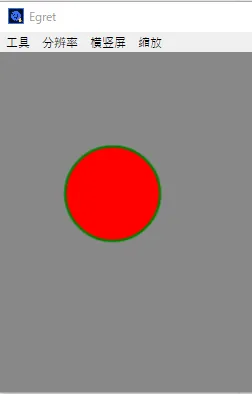
円を追加するには
drawCircle(x, y, 半径)

this.object.addChild(shape);
を使用します。
x, yは円の中心の座標です。
しかし、これだけでは無色透明なので、色を付けていきます。
まず、円に枠線を加えたい場合は
lineStyle(枠線の太さ, 色);を使用します。
注意点ですが、これは「beginFill」より先に書いてください。beginFillは図形を塗りつぶします。
しかし、endFillの後にlineStyleを適用しても塗りつぶされてしまったので、beginFillより上に書くのが無難です。
次に、円を塗りつぶしたい場合は
shape.graphics.beginFill(色コード);

shape.graphics.endFill();
を使用します。beginFillからendFillの間にある図形を色で塗りつぶします。
ちなみに、塗りつぶしをしなかった場合は透明となり、後ろのオブジェクトが透けて見えます。
(余談)Circleのwidthについて
class Main extends eui.UILayer {

        public constructor() {
        super();

        this.once(egret.Event.ADDED_TO_STAGE, this.addToStage, this);
    }

    private addToStage(event:egret.Event) {

        this.DrawCircle();

    }

    //円の描画
    private DrawCircle() : void {

        let shape:egret.Shape = new egret.Shape();

        shape.graphics.beginFill(0xff0000);
            shape.graphics.drawCircle(200, 300, 100);
        shape.graphics.endFill();
        this.addChild(shape);

        console.log(shape.width);

    }

}
//実行結果
//通常200と表示されるはずが、203になる
203上記の円の描画コードから、lineStyleを削除して、console.log(shape.width);を追加しました。
shape.widthで図形の横幅の長さが取得できます。
今回の場合、半径100pxの円なので、width = 200px(直径)となるはずですが、実際には203と表示されます。
これはEgretEngine側の仕様で、”WebGLのパッキングの問題でdrawCircleメソッドが下記のような実装になっている”からだそうです。
EgretEngineで半径5・直径10の円のSpriteを作成後にwidthが13になる問題
円のwidthを使用する際は、長さに注意してください。
長方形の描画
class Rect extends GameObject{

    constructor(){
        super();
        this.method();
    }

    method(){
        let shape:egret.Shape = new egret.Shape();
        shape.graphics.lineStyle(5, 0x0000ff);
        shape.graphics.drawRect(200, 300, 200, 100);//drawRect(x, y, width, hight);
        this.object.addChild(shape);
    }

}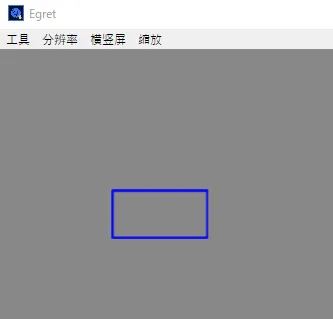
長方形を書くには、
shape.graphics.drawRect(x, y, 横幅, 縦の長さ);を使用します。
x, yは長方形の左上の点の座標になります。
直線の描画
class Line extends GameObject{

    constructor(){
        super();
        this.method();
    }

    method(){
        let shape:egret.Shape = new egret.Shape();
        shape.graphics.lineStyle(5, 0x000000);

        //lineTo(始点)からmoveTo(終点)まで線を引く
        shape.graphics.moveTo(200, 300);
        shape.graphics.lineTo(500, 500);
        this.object.addChild(shape);
    }

}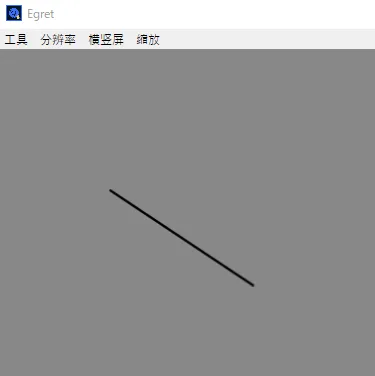
直線を引くには、
shape.graphics.moveTo(始点 x, y);
shape.graphics.lineTo(終点 x, y);
を使用します。
直線は枠の色と同様、lineStyleで着色します。
drowArc等を使えば、曲線もかけるので、是非公式のAPIもご覧ください。